
What is Jungle Scout’s Listing Quality Score (LQS)?
What It Is
LQS is Jungle Scout’s 1–10 grade for an Amazon listing’s optimization. Higher = stronger listing; lower = clear room to improve. It’s great for two jobs: scouting competitors during product research and auditing your own pages for conversion and rank.
How the Jungle Scout LQS Is Calculated
What LQS evaluates
Title — Length + keyword coverage. Clear, front-loaded, and readable wins.
Bullet points — All five used, benefits first, smart secondary keywords woven in.
Images — Count + resolution + variety (main, angles, lifestyle, infographic, scale).
Description/A+ — Depth, clarity, and keyword relevance; A+ Content helps.
Keyword richness — Cohesive coverage across title, bullets, description, and backend terms.
What carries the most weight (in my experience)
Images and Title — Non-negotiable. You won’t score high without both dialed.
Bullet points — Above-the-fold persuasion + indexing; treat them like mini landing pages.
Description / A+ — Adds polish, trust, and extra keyword coverage.
Backend keywords — Useful for indexing, but lighter impact on LQS than on-page elements.
Conclusion
A short title, few images, and one bullet point will sink your LQS—even if your description is great.
How do I find the LQS in Jungle Scout?
I pull LQS from three places—the Chrome Extension, Product Database, and Product Tracker. Use it to spot weak listings you can beat, then confirm with keywords and margins.
1) Chrome Extension (fastest scan)
Go to an Amazon search results page and click the Jungle Scout Extension.
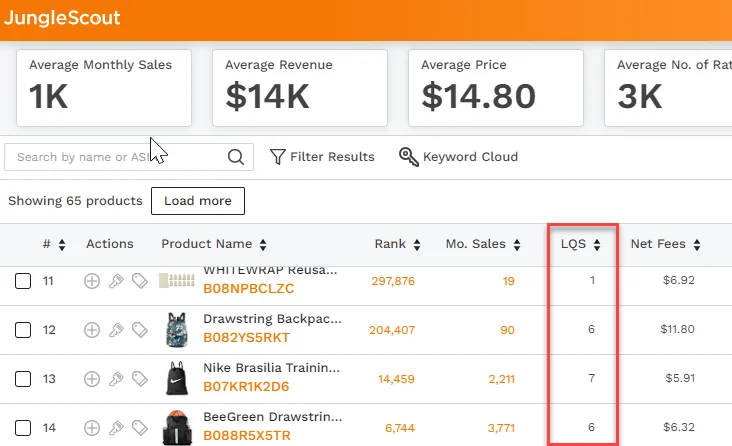
In the popup table, find the LQS column.
Don’t see it? Click Customize View → enable LQS.
Why I like it: instant, side-by-side quality read on page-one competitors.
2) Product Database (filter for opportunity)
JS web app → Product Research → Product Database.
Set core filters (category, price, sales), then add LQS (e.g., max 3) to surface weak listings.
Click Search and review LQS in the results.
Why I like it: quick way to find niches with fixable content gaps.
3) Product Tracker (ongoing monitoring)
JS web app → Product Research → Product Tracker.
Create/select a group; the summary view shows average LQS across tracked products.
Why I like it: keeps a pulse on how competitor quality shifts over time.
Pro tips
Low LQS ≠ auto-win. Use it as a signal, then check review moat, keyword depth, and margins.
Prioritize fixes: title + images + bullets move LQS fastest (and usually conversion, too).
Track change: recheck LQS after you update a listing to see if quality improvements stick.
How To Use LQS in Product Research
LQS is a fast lever for finding markets with real demand but weak listings. Use it to hunt low-hanging fruit, then validate with keywords, margins, and trend data before you commit.
Strategy 1: High demand, low LQS (the classic play)
Goal: Surface products that sell despite poor listing quality.
How:
Product Database → filters: category, price, sales volume.
Add LQS filter: set max LQS = 3–4 to expose weak listings.
Triage results: prioritize high sales + low LQS; these sellers are leaving money on the table.
Tighten competition: cap reviews (e.g., ≤500) to avoid entrenched leaders.
Why it works: You can out-execute with better titles, images, bullets, and A+ content.
Strategy 2: Page-one reality check with the Chrome Extension
Goal: Verify how hard page one really is.
How:
Search your root keyword on Amazon (e.g., “dog pee pads”).
Run the Chrome Extension and scan the LQS column.
Interpret:
LQS 7+ → strong, optimized competition; you’ll need a real edge (offer/brand/design).
LQS ≤3 → green light; weak listings on page one = quicker wins.
Audit low-LQS winners: click into listings; note short titles, few/poor images, thin bullets—these are your upgrade targets.
Strategy 3: Monitor niches in Product Tracker
Goal: Track if your edge is closing.
How:
Add shortlisted ASINs to Product Tracker.
Watch the average LQS for the group over weeks.
If the average rises, competitors are improving—adjust timing, positioning, or move on.
Pro tips
LQS is a signal, not a verdict. Confirm demand (sales), moat (reviews), seasonality (Trends), and profit (calculator with real landed costs + PPC + returns).
Prioritize fixable gaps: Title + Images + Bullets move LQS (and conversion) fastest.
Avoid winner-takes-all markets: If two listings hoard revenue, LQS alone won’t save you.
Fast go/no-go checklist
High sales + low LQS present
Revenue not concentrated in 1–2 ASINs
Review moat you can realistically beat
Trends stable or seasonality manageable
Profit holds after conservative ad/return assumptions
Conclusion
Use LQS to find soft spots, then earn conviction with keywords, margins, and trend proof. When all five signals align, that’s a product worth testing.
How Can I Improve My Listing’s LQS?
What matters most: Images → Title → Bullets → A+ / Description → Backend terms. Do those in that order. If you want guardrails while you edit, use Listing Builder and watch the Listing Optimization Score (LOS) climb in real time.
1) Title (impact + indexing)
Front-load the primary keyword; keep it readable (no comma soup).
Pack essentials: brand, product type, key attribute(s), size/count/material.
Length: use the available characters without stuffing; aim for a clean, skimmable first ~70 chars for mobile.
Template: Brand – Primary Keyword | Key Attribute | Size/Count | Material/Variant
2) Bullets (benefits > features)
Use all five. Lead each with a benefit in caps (e.g., “LEAK-PROOF DESIGN: …”), then the supporting feature.
Weave secondary keywords naturally; keep lines tight and scannable.
Answer objections you see in reviews/Q&A (fit, compatibility, care, warranty).
3) Images (LQS heavyweight)
Main image: pure white, fills 85%+, crisp edges.
Resolution: ≥1000px for zoom (I prefer 2560px long side).
Fill the slots (7–9): angles, close-ups, packaging, lifestyle, infographics (dimensions, use cases, “what’s included”).
Optional video: short demo or 30–45s feature reel—huge for conversion.
4) Description & A+ Content (sell the story)
A+ for Brand Registered: modular visuals, comparison chart, FAQs.
Write for humans first: outcomes, use cases, care, sizing, who it’s for.
Keywords: treat A+ as conversion-first; include terms naturally (A+ isn’t reliably indexed, but better engagement lifts rank).
5) Backend keywords (finish the index)
Use the 250 bytes for synonyms, regional terms, misspellings you couldn’t fit up front.
No duplicates/brands/claims that break policy. Keep it relevant and clean.
My 90-minute optimization sprint
Audit with the Chrome Extension (note current LQS) and pull top competitor gaps.
Rewrite title + bullets (benefits first), drop in secondary terms.
Image plan: add a dimension infographic, a lifestyle shot with scale, and a comparison chart.
A+ refresh: answer top 3 objections from reviews in modules.
Backend: fill remaining term gaps.
Publish → re-check LOS/LQS, then monitor sessions, CVR, and organic rank for 10–14 days.
Pitfalls to avoid
Keyword stuffing that hurts readability (and conversions).
Low-res/repetitive images—every slot must earn its keep.
Feature lists with no benefits (customers buy outcomes).
Ignoring reviews/Q&A—they’re your copy outline.
Conclusion
LQS rises when you nail clarity, completeness, and relevance. Prioritize images, title, and bullets; let A+ and backend terms round out conversion and indexing. Track before/after metrics—if CVR and rank improve, your LQS (and revenue) will follow.
LQS vs. LOS (Listing Optimization Score)
Overview
LQS (Listing Quality Score) = a static diagnostic for live Amazon listings. Great for spotting weak competitors during product research.
LOS (Listing Optimization Score) = a dynamic, real-time coach inside Listing Builder while you create/edit your own listing.
What each does best
LQS — find opportunity
Use when: scouting markets and auditing competitors.
Where: Chrome Extension, Product Database, Product Tracker.
What it checks: title length/keywords, bullet/description quality, image count/resolution (1–10 score).
My rule: High sales + low LQS = “fixable gap” you can exploit with better content.
LOS — build it right
Use when: writing your listing.
Where: Listing Builder only.
What it checks: best-practice checklist + keyword coverage, updates live as you type.
My rule: take LOS into the “green,” but keep copy human and conversion-focused.
How I combine them (simple workflow)
Prospect with LQS: In Product Database, filter for demand, then set max LQS 3–4 to surface low-quality competitors.
Verify on page one: Use the Extension; if most leaders are LQS ≤3 and revenue isn’t concentrated in 1–2 ASINs, proceed.
Build with LOS: In Listing Builder, write title/bullets/images plan until LOS turns green; weave in priority keywords.
Ship & measure: Publish, then track sessions, CVR, rank. Iterate images/bullets first—fastest lifts for both LQS and conversions.
Quick cheat sheet
Purpose: LQS = research; LOS = creation.
Data source: LQS reads a live page; LOS scores your draft content.
Score type: LQS static 1–10; LOS live, changes as you edit.
Where: LQS in Extension/DB/Tracker; LOS in Listing Builder.
Conclusion
LQS tells you where you can win; LOS helps you build a listing that actually does. Use both, in that order.
Examples of Good and Bad Listings Based on Their LQS
Rule of thumb: LQS ≤3 signals fixable basics; LQS ≥7 means you’ve nailed fundamentals. Use these contrasts to decide what to fix first.
Low LQS example (poor listing)
“KCHEX 100 Doggy Pad” — LQS: 3
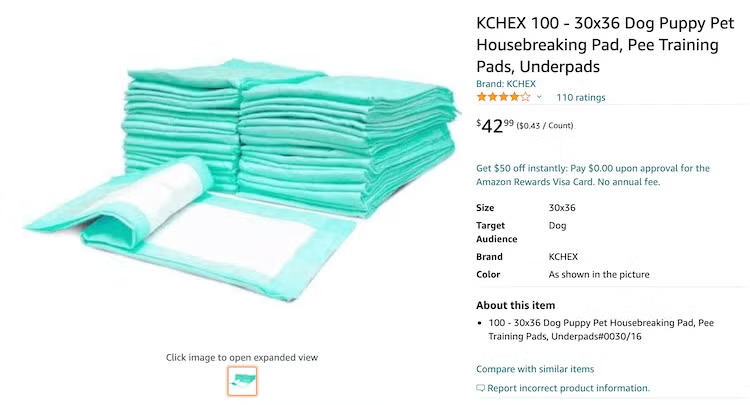
What’s going wrong
Title is vague: “KCHEX 100 Doggy Pad” says almost nothing—no size, use case (housebreaking), layers, or odor control.
Bullets missing: Only one bullet, and it parrots the title—no benefits, no features.
Images weak: A single, low-quality image; no angles, lifestyle, or scale—customers can’t evaluate the product.
Bare description: Minimal copy; doesn’t answer common questions or overcome objections.
How I’d fix (fast wins)
Rewrite the title with primary keyword + size/pack + key benefit.
Use all 5 bullets, lead with benefits (ABSORBENCY, ODOR CONTROL, LEAK PROTECTION, FIT/ SIZE, VALUE).
Upload 7–9 high-res images (main, angles, lifestyle, dimensions, feature infographic).
Expand description/A+ to address use cases and care.
High LQS example (strong listing)
“JUNGLE CREATIONS Washable Pee Pads for Dogs” — LQS: 7+
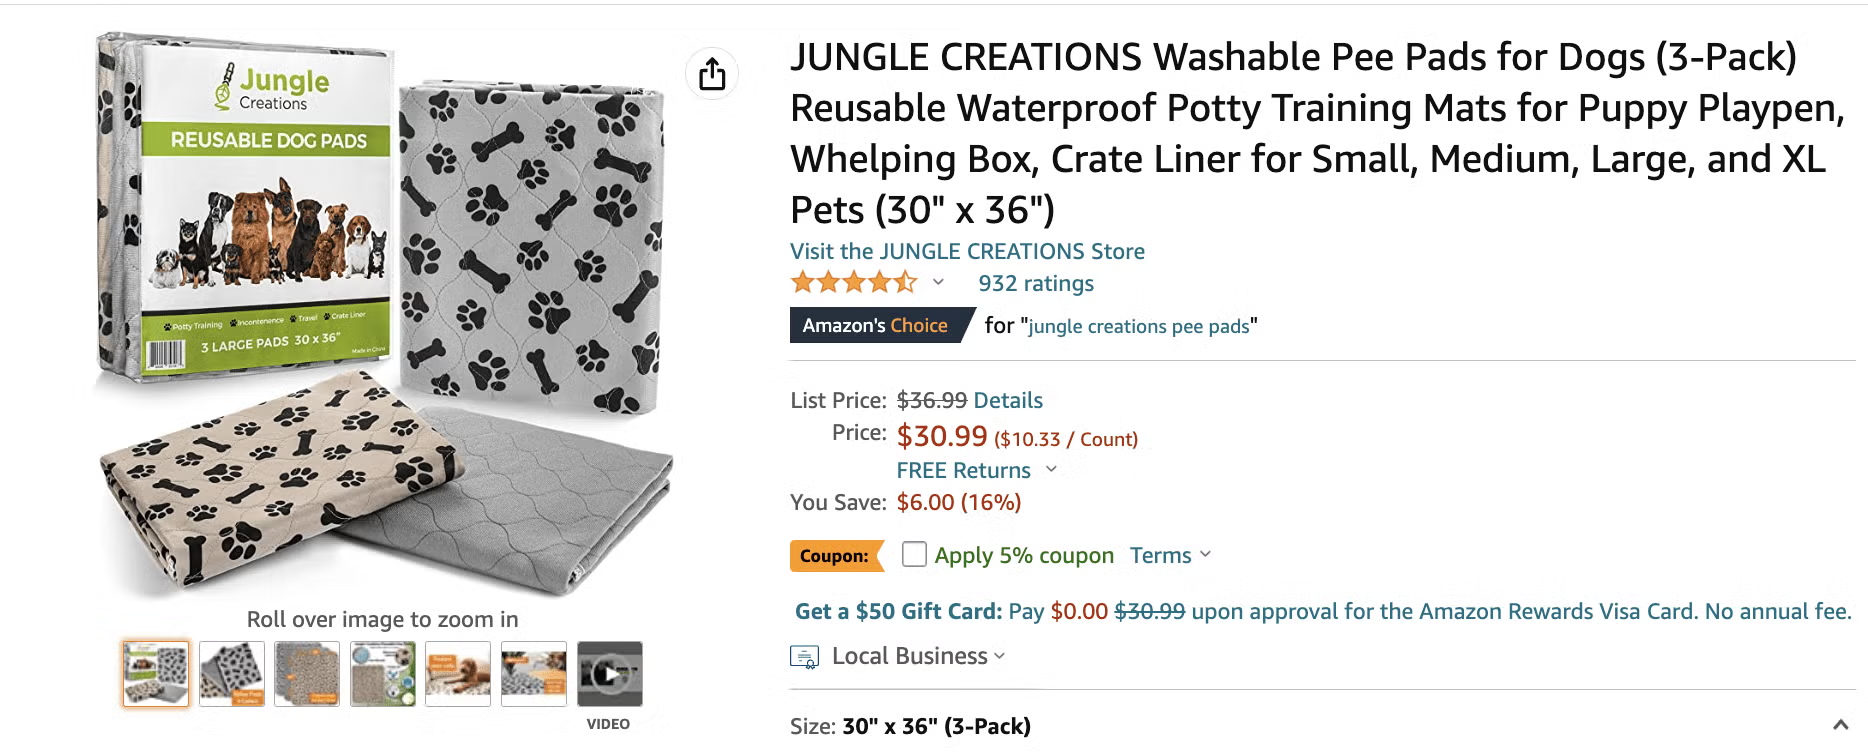
What’s working
Optimized title: “Washable Pee Pads… Reusable Puppy Potty Training Mats, Waterproof Whelping Pads, X-Large” — rich, readable, keyword-smart.
Complete bullets: All five used; clear benefits (reusable, waterproof, sizing, durability) with skimmable formatting.
Image stack: Full gallery of high-res shots—clean main, lifestyle, dimension infographic, multi-layer cutaway.
A+ Content: Visual modules and branding that elevate trust and conversion.
Where to push further
Tighten bullets for scannability on mobile; test a comparison chart in A+; add a short demo video.
My quick LQS playbook
Title & Images first (biggest LQS levers).
Bullets = benefits → features (use all five).
A+ to tell the story, answer objections, and boost conversion.
Backend terms to cover synonyms/misspellings you didn’t fit up front.
Conclusion
Low LQS is usually just under-optimized content—not a dead market. Fix the fundamentals (title, bullets, images) and you’ll move both your LQS and your conversion rate.
Jungle Scout Listing Quality Score (LQS) FAQ
Jungle Scout’s Listing Quality Score (LQS) is a 1–10 snapshot of how well an Amazon listing is built—looking at the title, bullets, description, images, and overall keyword usage. High LQS usually means better visibility and conversion, while low LQS flags fixable gaps (great for finding niches with demand but weak listings). You’ll see LQS in the Chrome Extension (enable the column if needed), can filter by it in Product Database to surface opportunities, and can monitor averages in Product Tracker. Use it as a fast signal, not the verdict—always sanity-check with sales velocity, competition, seasonality, and margin math before you commit.
LQS is the foundation, not the finish line. A great Listing Quality Score helps you get seen and convert better—but it can’t conjure demand, beat entrenched review moats, or fix a weak offer.
Why LQS alone won’t move units
- It’s a tool, not a magic bullet. LQS tells you the listing is well-built (keywords, images, bullets). It doesn’t prove the product will win in the market.
- Sales velocity rules Amazon. The algorithm rewards momentum. LQS can boost conversion, but you still need traffic and purchases to climb.
- It grades the listing, not the product. If the product underwhelms, reviews will drag you down—no matter how polished the page is.
What actually drives sales (alongside LQS)
- Verified demand: Use history and trend data to confirm the niche buys—consistently.
- Competitive price & offer: If you’re not price-competitive or your bundle/USP is weak, you’ll bleed clicks and lose the Buy Box.
- Social proof: Review count, rating, and recent review velocity crush a pretty listing every time.
- Inventory continuity: Stockouts nuke rank and momentum; forecast and buffer.
- Paid traffic: PPC jump-starts visibility and velocity; organic ranking follows.
- Ops hygiene: Fast handling, low defect/return rates, responsive support—quietly critical.
How to turn a strong LQS into real sales
- Quantify demand: Validate with multi-month sales trends and seasonality before you order.
- Win on offer, not just copy: Differentiate (bundle, materials, sizing, warranty)—don’t be a commodity at a premium.
- Price to land the Buy Box: Set a target margin, but anchor to page-one reality.
- Seed social proof fast (within ToS): Drive early orders via PPC/Deals/Coupons; aim for steady review velocity.
- Run PPC with intent: Start with high-relevance terms from your keyword research; measure CVR, CPC, and TACoS; prune fast.
- Watch the right metrics: Sessions, CVR, BSR movement, CTR, Buy Box %, and return rate—iterate images and bullets first.
- Protect momentum: Keep 30–45 days of stock on hand (more in peak season); avoid going dark.
Use LQS to build the best version of your listing, then earn rank with demand, price, reviews, inventory, and PPC. Great LQS gets you ready to win; the rest of your strategy makes it inevitable.
Jungle Scout’s LQS is a 1–10 score that rates how well an Amazon listing is built—looking at the title, bullet points, description, images, and overall keyword usage (including backend terms). In practice, 7+ = well-optimized, while <3 = weak with obvious fixable gaps. I treat LQS as a fast signal for research and audits—great for spotting listings you can outperform—but I always pair it with demand, pricing, and reviews before making decisions.
Think of LQS as a snapshot of listing health (1 = poor, 10 = excellent). It’s most useful for comparing competitors and spotting fixable gaps.
1–3: Poor quality
Read: Short/weak titles, thin bullets, few/low-res images, shallow descriptions.
My move: If sales are strong despite low LQS, that’s low-hanging fruit—launch with a fully optimized title, bullets, image stack, and A+ to steal share.4–6: Average quality
Read: Some best practices met, but obvious misses (image depth, keyword coverage, incomplete copy).
My move: Audit specifics—if you can clearly outdo images, bullets, and keyword depth, it’s a reasonable bet; otherwise, keep searching.7–10: High quality
Read: Keyword-rich title, complete bullets, full gallery of high-res images, solid A+ content.
My move: Expect tougher competition. You’ll need a real edge (offer/design bundle, pricing, reviews, or brand) to win—not just better copy.
LQS is a signal, not a verdict. Before you commit, validate demand (sales velocity), review moat, pricing power, seasonality, margins, and your PPC plan.
Where to find LQS in Jungle Scout
Chrome Extension: Search on Amazon → open the Extension → Customize View → enable LQS to see scores in the table.
Product Database: Go to Product Research → Product Database → set your filters → add an LQS range (e.g., max 3 to surface weak listings) → Search.
Product Tracker: Product Research → Product Tracker → select a group to see the average LQS for tracked products in the summary.
Images → Title → Bullets → A+ / Description → Backend terms. Do them in this order. If you want live guardrails as you edit, use Listing Builder and watch the Listing Optimization Score (LOS) climb in real time.
Title (indexing + click-through)
Front-load the primary keyword and keep it readable (no comma soup).
Use the space wisely: brand, product type, key attributes, color/size/count—without repeating terms.
Stay compliant: no promos (“best seller,” “free shipping”), no ALL CAPS.
Bullet points (benefits first, features second)
Use all five. Lead each with a benefit (draw the eye), then the supporting feature.
Be scannable: short lines, bold/ALL-CAPS lead words if your style allows.
Add specs: quantity, dimensions, materials, use cases—answer common questions right here.
Images (the biggest LQS lever)
Fill the gallery (up to 9). Main on pure white, product fills ≥85%.
High resolution: enable zoom (≥1000px long side; I prefer ~2560px).
Tell the story: lifestyle shots, dimension/feature infographics, what’s-in-the-box, and—if possible—a short video.
Description & A+ Content (conversion engine)
If Brand Registered, go A+: visual modules, comparison chart, FAQs.
Expand on bullets with benefits and use cases; write for humans, not just bots.
Keywords naturally: A+ isn’t heavily indexed, but better engagement helps rank.
Backend keywords (finish your index)
Use the 250 bytes for synonyms, regional terms, misspellings you couldn’t fit up front.
No repeats, punctuation, or competitor brands. Separate terms with spaces.
How I’d execute (60–90 minute sprint)
Rewrite title and bullets (benefits first; weave secondary keywords).
Plan/upgrade image stack (add a dimension infographic + lifestyle with scale).
Build A+ with a comparison chart and objection-busting FAQ.
Fill backend terms to cover gaps.
Publish → track sessions, CTR, CVR, rank; iterate images/bullets first.
Pro tips
Mobile matters: front-load the most important ~70 characters in the title.
Mine reviews/Q&A for copy and image ideas—customers hand you your messaging.
Consistency wins: stockouts and slow responses kill momentum (and ranking).
LQS climbs when you nail clarity, completeness, and relevance. Prioritize images, title, and bullets; let A+ and backend terms round out conversion and indexing. Use LOS for real-time feedback, then measure the lift.