
Amazon sellers spend a considerable amount of time and money optimizing their listings to attract more significant sales.This process includes using SEO, taking high-quality pictures, filling the listing with trusted reviews, answering all the questions, and much more.
But most sellers forget to pay attention to their product category. While this may feel like a primary topic, selecting the right product category is an important part of your Amazon listing.
If you find that you’ve chosen the wrong category, it’s important to change it for accuracy. To better understand how and when to change the category, we have curated some helpful tips for both newbie and seasoned sellers.
What are some of the reasons to change Amazon product categories?
While there can be countless reasons for changing it, we have taken the liberty to include some of the most reasonable and common causes of category issues.
Amazon Category Specialists

Bots have to be the very first explanation of category change. Amazon category specialists or bots constantly scour the deep ends to find products that do not fit the initial category selection. Most of these bots make changes in the category by reviewing customers’ reviews and other sellers’ complaints. If your situation resembles this problem, you might have to change your category to place it under the correct sub-categories.
Changes because of a third person or Amazon
Your current category can get automatically shifted to a gated category because of a seller.Unfortunately, Amazon does not disclose why a category change occurred, even if it was an honest mistake from the seller’s side or Amazon’s side.This issue will require you to change your product category as soon as you can. Keeping it unattended will indeed result in fewer sales.
To make your product more discoverable
When shoppers shop on Amazon, they sometimes forget to use the search bar and browse the categories.Bored shoppers usually go through categories to find deals and other exciting products that they can purchase.Therefore having your products in a correct and relevant category will boost its chances of discoverability. The result is organic traffic and sales that create an impact on your overall listing.
The possible negative effects of category change

Lose ranking status
When you change your category, all of the hard SEO work you’ve done to climb in the rankings can be undone. While this can be temporary, it can cause short-term drops in traffic. So, have a plan in place for optimizing your listings in their new category to move back up in search results.
Low sales
As buyers find it hard to search or find your product via browsing, it could drastically reduce your sales. So, even if your products were doing great before, you may notice a down graph in your sales. Again, having a proactive strategy in place can help counteract this. Look for alternative methods for marketing your products while you work to regain your ranking.
Losing tags
If your product has received tags like bestseller or Amazon choice, you can lose the title with time. Since sales and popularity are interlinked, you will end up losing your tag. However, you can earn these special badges again in the future so be diligent about sales and service efforts.
Changing product category
Submitted an Amazon Seller support ticket

If you are a new seller or do not wish to meddle in the backend, we highly recommend contacting Support.
- Log in to Seller Central and create a case with Support.
- Explain your issue with the latest category placement.
- You will be asked to provide a few details for opening the ticket.
- If you have already selected the final category route, we request you attach it to your ticket.
- Your last step is to ask the Support to make the desired changes so your product can be seen in the correct category.
If your request isn’t initially successful, persistent follow-ups can help you get your product back in the desired category list and sub list. If the problem was from Amazon’s side, you could ask Support for reimbursement from Amazon.
Tip: If you aren’t sure about your category, we suggest you search on Amazon for a similar product to your item and find their category path. You can then download this category path (categories and sub-categories) and ask Seller Support to put your product on the same path.
Further reading: How to contact an Amazon seller.
Changing through ‘Manage inventory’
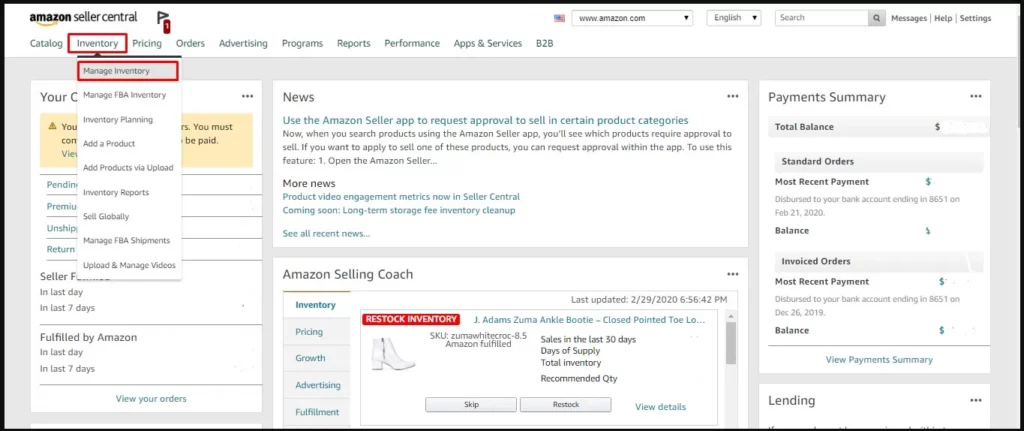
If you want to change the Amazon category by yourself, we highly recommend this simple and easy way to do it via Manage inventory.
Step 1: Log in to your Seller Central and Click ‘Inventory’. Upon clicking, a drop-down menu will appear. Select ‘Manage Inventory’ to start with the process of changing categories.
Step 2: Find the product you wish to change and click on ‘Edit’ at the right-hand corner of the listing.
Step 3: You will notice a new page with all the details. Select ‘Vital info,’ scroll down, and click ‘Category type.’ Once you select ‘Edit,’ a new dialogue box will appear with all the vital category types.
Step 4: You can either search for a main category or scroll to find the most suitable. Once you select the main category, a side box will automatically fill with sub-categories. Select the most appropriate option and look for the second sub-category. Once you are done selecting, click ‘ Select.’
Step 5: Go to your ‘Category/ Item Type’ row, and you will automatically see the entire string of new categories. Choose ‘Save and Finish’ to lock in your new information.
This method is excellent if you want to edit a few Amazon products listings, but if you wish to save time or want to change the category of multiple products, we recommend following this method:
Step 1: Go to ‘Inventory’ and select ‘Add Products via Upload.’ Generate an appropriate and suitable inventory file template.
Step 2: Enter all the product information and include a new category in the ‘Item Type Keyword’ column.
Step 3: Upload the file on the ‘Check and Upload your Inventory File’ tab of ‘Add Products’ via the Upload page.
Understanding Amazon Product Categories
Now that you have tackled the fundamental problem of changing your categories, we wanted to help you learn a few tricks and tips for a successful listing and choosing the right category.
The most common product categories
Main Amazon Categories
- Books
- Electronics
- Home & Kitchen
- Clothing, Shoes & Jewelry
- Toys & Games
- Beauty & Personal Care
- Health, Household & Baby Care
- Movies & TV
- Grocery & Gourmet Food
- Computers & Accessories
- Sports & Outdoors
- Tools & Home Improvement
- Musical Instruments
- Automotive Parts & Accessories
- Pet Supplies
Importance of Selecting the Right Category on Amazon
- Search Visibility: Amazon’s search algorithm, known as A9, uses product categories to filter search results. By placing your product in the correct category, you increase its visibility to relevant consumers.
- Customer Expectations: Shoppers on Amazon generally have an idea of what they’re looking for. By categorizing your product correctly, you ensure that it meets the expectations of these potential buyers when they browse through specific categories.
- Competitive Analysis: Understanding and analyzing your competitors is easier when you’re in the right category. This can aid in pricing decisions, marketing strategies, and inventory management.
- Ad Campaign Optimization: For sellers who use Amazon’s advertising solutions, categorizing products correctly can lead to more efficient and targeted ad campaigns.
- Avoid Listing Issues: Amazon has strict guidelines about listing products in the correct categories. Incorrect categorization can lead to your product being delisted or even account suspension.
- Category-Specific Features: Some categories offer unique features or promotional opportunities. For instance, books in the “Books” category are eligible for “Look Inside,” a feature that allows potential buyers to preview the content.
Note: The actual list of categories might be more extensive, and Amazon is constantly introducing new categories or changing the existing ones.

Want to boost your profits and streamline your Amazon FBA business?
Categories that require approval
Since Amazon wants its customers to have the best shopping experience, it has a few strict rules for categories. Specific categories, products, and sub-categories require Amazon’s approval before a seller lists the products. This approval process usually involves submitting reports of performance checks, qualifications, and document requests.
- Collectible Coins
- Postage stamps
- Fine Art
- Jewelry
- Personal Safety and Household products
- Music & DVD
- Services
- Watches
- Sports Collectibles
- Video, DVD, & Blu-ray
- Streaming Media Players
- Automotive & Powersports products
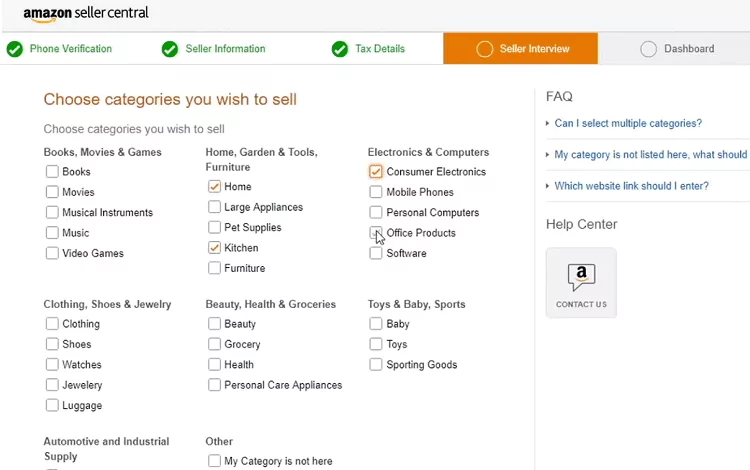
If you are an Amazon seller dealing with the products mentioned above, you must pass the approval process to start selling under the category. You can follow these steps for the approval process:
Step 1: Log in to the Seller Central page and select the ‘Catalog’ menu. Click on ‘Add a product’ to initiate the process.
Step 2: Search for the item that you wish to sell. You will notice a ‘Show limitation’ link in the search results.
Step 3: Click on the ‘Apply to sell’ option to begin the application process. Amazon might revert within a few hours/days for other details. If you are accepted, your Seller Central page will automatically notify you.
These steps were exclusively for sellers selling new items. However, if you deal with refurbished or used items, we recommend viewing this product categories table to see which products require approval and which don’t.
How can you use the Amazon Product Category Tree to optimize your listings?
As you might know, every product category uses a specific structure, usually in the form of a tree that has various levels of sub-categories.
This tree is called a BTG (Browse Tree Guide). This guide contains specific guidelines that are generally used to assign products under different categories.
If you wish to optimize your product listing, we highly recommend using BTG to help achieve that. In addition, this document usually enables you to decipher which sub-category your product belongs to.
The sub-category is popularly known as ‘node.’ You can also use the unique number and keyword combination to put your products on specific browsing paths on Amazon.
To skillfully use a Browse Tree Guide, follow these steps:
Step 1: Head to ‘Inventory File Templates’ and consider downloading an appropriate BTG.
Step 2: The guide has all the essential instructions to help you choose the main categories and sub-categories.
Step 3: Copy and use all the corresponding ‘browse node IDs’ when you begin the process of updating your inventory template file.
Staying on top of your Amazon listings’ product categories
We hope this guide clears your doubts regarding the process of changing Amazon categories.
As mentioned earlier, you should never underestimate the importance of adding your product listings in the correct categories. It’s also vital to evaluate your product listings and ensure they are in the most accurate category.
Many sellers try to add a standard product in obscure or unrelated categories to earn ranks. But since Amazon constantly keeps an eye on such listings, they have a chance of getting penalized for doing so.
If your current product is in such obscure categories, we highly recommend moving them using the easy methods mentioned in the article.
Lastly, if you are selling an item that requires approval, ensure that you carry out the approval process beforehand to save time. Categories can be an excellent tool to heighten your sales, so do not miss out on the opportunity to increase your sales by using categories and sub-categories.
Frequently Asked Questions
What categories are ungated on Amazon?
Ungated categories on Amazon are those that any seller can list products in without requiring special permission or approval from Amazon.
While the list of ungated categories can change based on Amazon’s discretion, most of the main categories like Books, Electronics, Home & Kitchen, Clothing, Toys & Games, and more tend to be ungated.
However, it’s always a good practice to check Amazon’s current guidelines or Seller Central for the most up-to-date list of ungated categories.
When should I avoid changing my product category?
You should avoid changing your product category in the following situations:
– When your product is already ranking well and generating sales in its current category.
– During peak sales periods like the holiday season, where a change could disrupt sales momentum.
– If the new category doesn’t accurately represent your product, as misleading categorization can lead to customer dissatisfaction and potential returns.
– If you’re unsure about the requirements and restrictions of the new category, which might lead to unexpected issues or listing deactivations.
How do I know if and why Amazon changed my product category?
If Amazon changes your product category, you might notice a difference in your product’s listing placement or its performance metrics. To verify if Amazon has made a change:
– Check the “Manage Inventory” section in Seller Central. Changes in category should be reflected here.
– Review any notifications or emails from Amazon, as they may communicate changes or updates related to your listings.
– If you can’t identify a clear reason from your notifications, you can contact Amazon Seller Support to inquire about the change and its cause.
What if my product category won’t change in Seller Central?
If you’re facing issues changing your product category in Seller Central:
– Ensure you’re adhering to all guidelines for the new category. Some categories have specific requirements or are gated, needing approval.
– Clear your browser cache and cookies, or try using a different browser.
– Check if there are any pending changes or actions required on your account, which might be preventing changes.
– Contact Amazon Seller Support for assistance and to address any potential glitches or issues.
Resources: