If you’re not careful with the FBA labeling process, you may receive your entire inventory back. To avoid this headache that can cost you time (and money), we’ve created this guide on all things Amazon FBA labels. We’ll talk about how to print Amazon labels, how much they cost to make and answer any other questions you might be wondering. Let’s get to it!
What Are Amazon FBA Labels?
Amazon FBA labels are specific labels that help Amazon collect, store, distribute and ship your products in the fulfillment centers.
FBA (Fulfillment By Amazon) is a very large-scale operation, so Amazon heavily relies on these specific barcodes and labels. These labels ensure that the right customer gets the right product from the right seller.
In addition, Amazon FBA labels make the tedious process of sorting, managing, and shipping a breeze. That means quick shipping and quicker deliveries.
Failing to create accurate Amazon FBA labels can lead to unnecessary fines, delays, and sometimes even returning your products from the fulfillment centers.
Common Types of Amazon FBA Labels Barcodes?
There are three primary types of barcodes that are necessary to track your Amazon FBA shipment or individual products:
- Manufacturer barcodes – UPC, JAN, EAN, or ISBN
- Amazon barcodes – FNSKU
- Brand owner barcodes — this is a transparency authenticity code that you may need to protect your brand and products from counterfeits.
Manufacturer Barcode
The manufacturer barcode is part of the label that already exists on your products — your manufacturer places these labels for tracking.
Amazon will automatically notify you if the manufacturer barcode qualifies for the shipment. Since these codes are universal, sometimes a seller can get away with using the same barcode for all sales.
Amazon accepts ISBN, UPC, and EAN barcodes for global FBA shipments. These barcodes change according to the commodity; for example, ISBN barcodes are exclusively usually used for books and book covers.
Amazon Barcode
The FNSKU barcode (Fulfillment Network Stock Keeping Unit) is an alphanumeric barcode exclusively for Amazon and its sellers. FNSKU barcodes are often used when your product isn’t eligible for a manufacturer’s barcode.
There’s a reason why you may want to use a FNSKU barcode more than any standard UPC, and that’s the code’s individuality. Since Amazon is a vast platform, there may be other sellers selling the same product as you. When two sellers have identical codes, it becomes tough for Amazon to track which account got the order. Following the barcodes in reverse to get the original seller can indeed be a cumbersome task.
To avoid this, Amazon encourages all its sellers to print out FNSKU barcodes for box labeling. You can easily find these codes in your inventory section of Seller Central.
Note: You can only access FNSKU barcodes after you have entered your products into the Amazon Inventory System.
What Should Amazon FBA Labels Contain?
Some sellers make the mistake of overstuffing or under-stuffing their Amazon FBA labels. Fewer details can make it difficult for the fulfillment team to allocate your products to the correct storage. But too much information can make them difficult to read.
To keep things simple yet effective, each label of your shipment should contain these essential things:
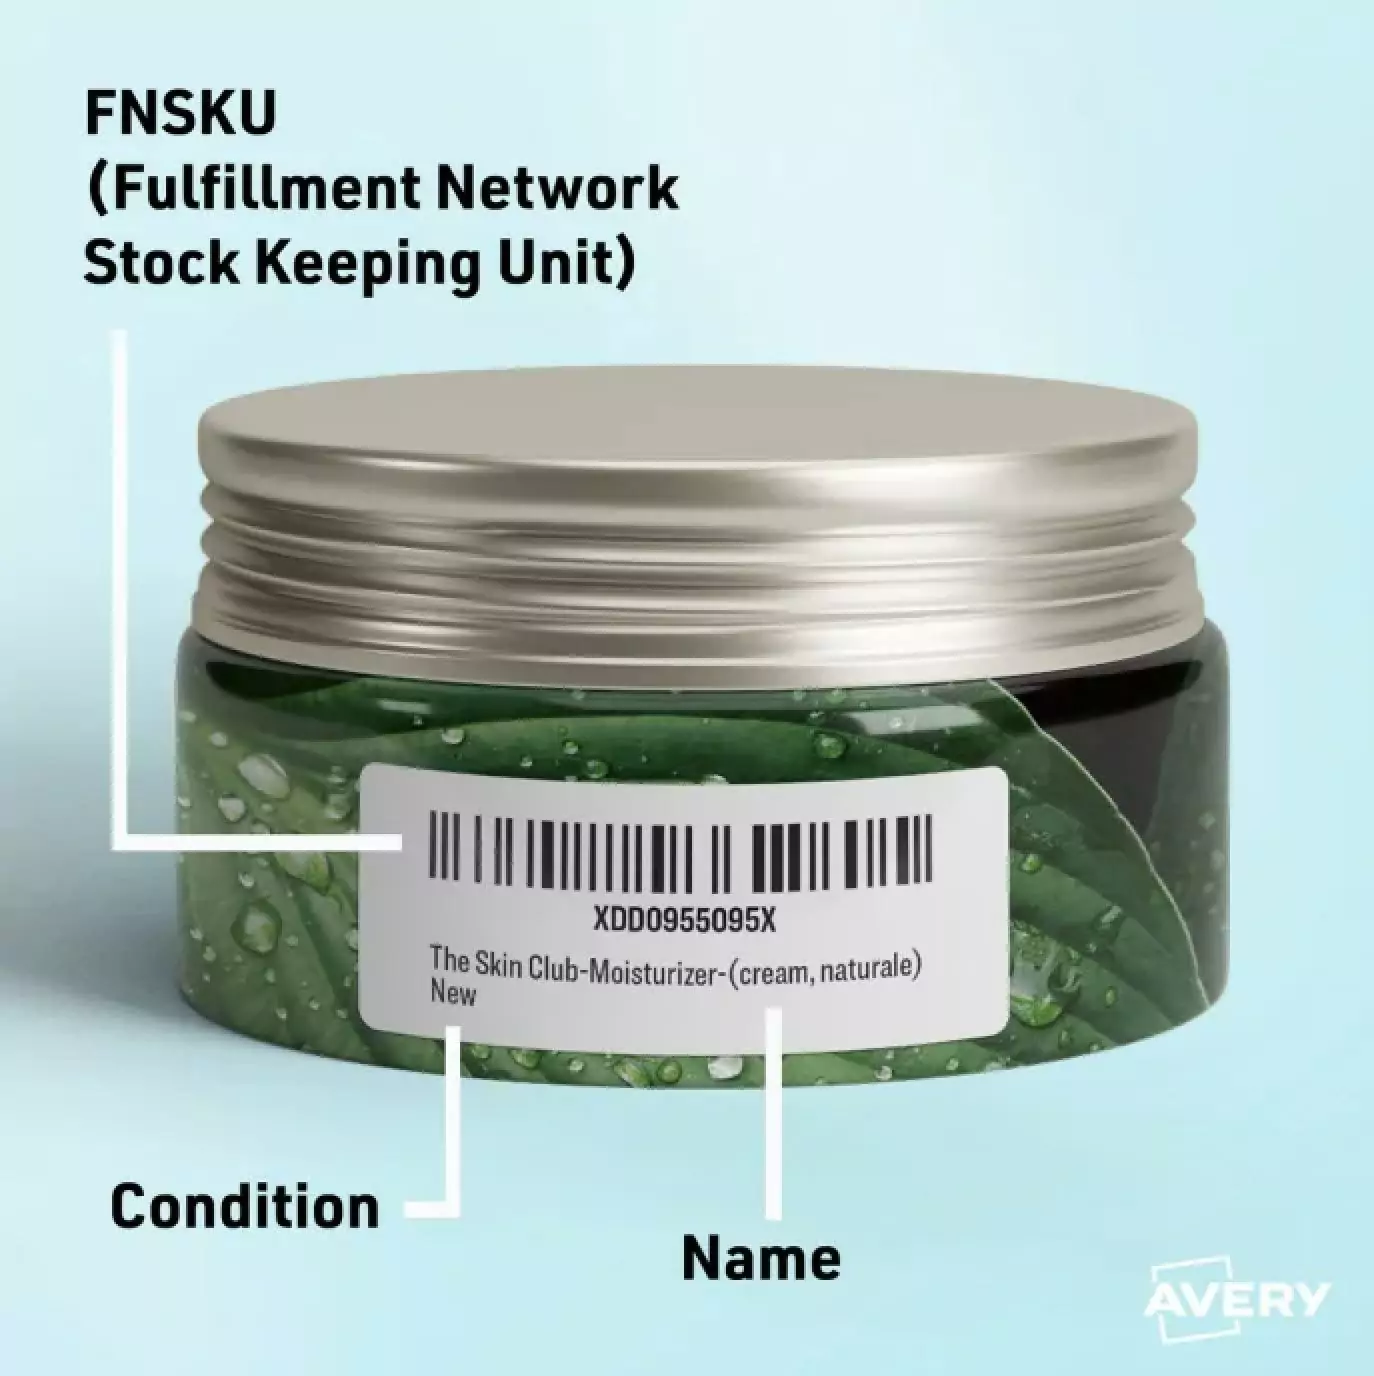
1. FNSKU (Fulfillment Network Stock Keeping Unit)
This is the most important part of an FBA label. The FNSKU is Amazon’s unique identifier for your product and connects the item specifically to your seller account. Every individual product you send to an Amazon warehouse must have its own FNSKU label unless it’s enrolled in the stickerless, commingled inventory program.
-
Example: X000ABCD12
-
This ensures that when your item sells, Amazon knows exactly which seller it belongs to.
2. Product Title or Description
The product title or a brief description is often included for reference so you can easily identify what’s inside the package without scanning the barcode. It’s optional but useful for organizing and verifying shipments.
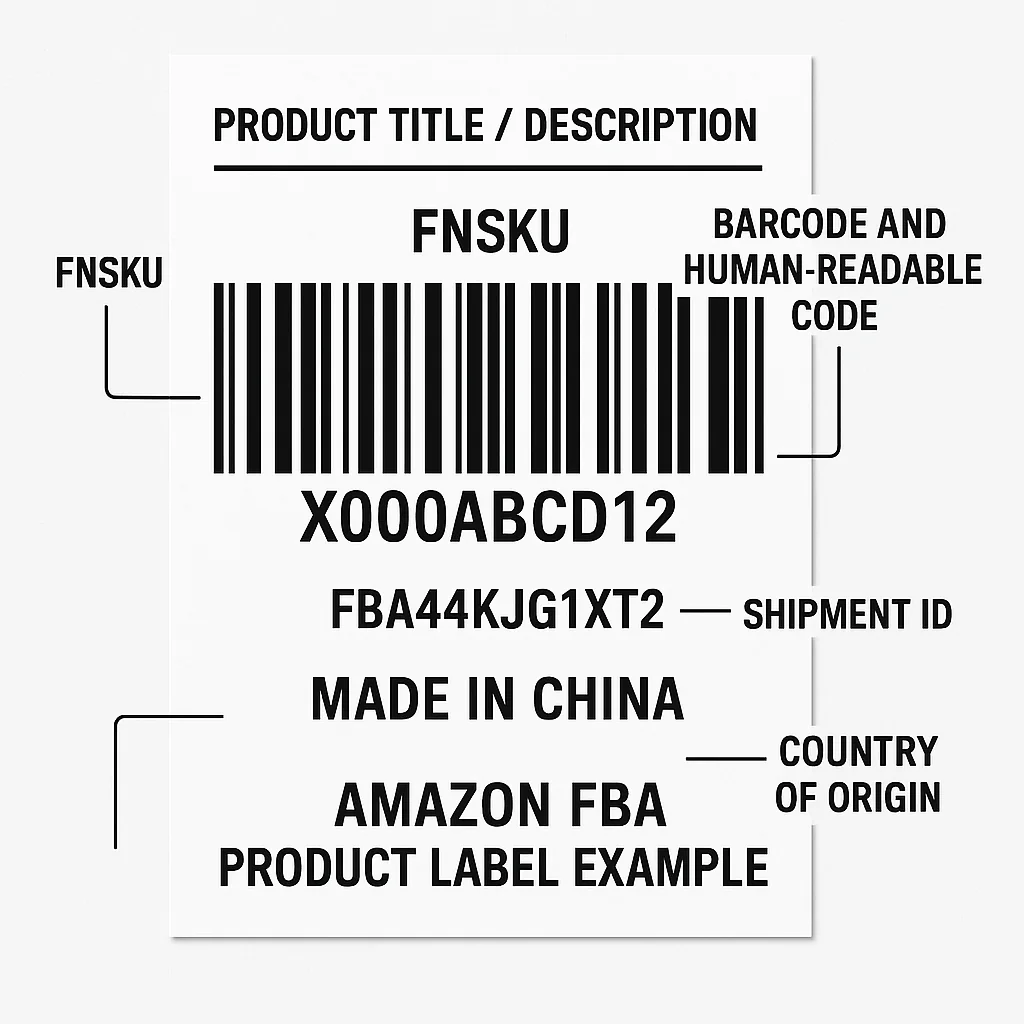
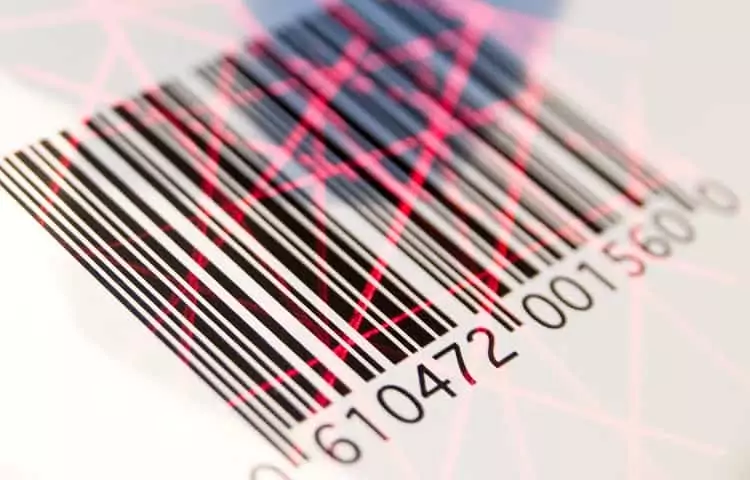
3. Barcode and Human-Readable Code
The FNSKU should be printed as both a scannable barcode and a human-readable alphanumeric string. The barcode must be:
-
Scannable by a standard laser scanner
-
Printed clearly on white, non-reflective labels
-
At least 1 x 2 inches in size (Amazon’s recommended minimum)
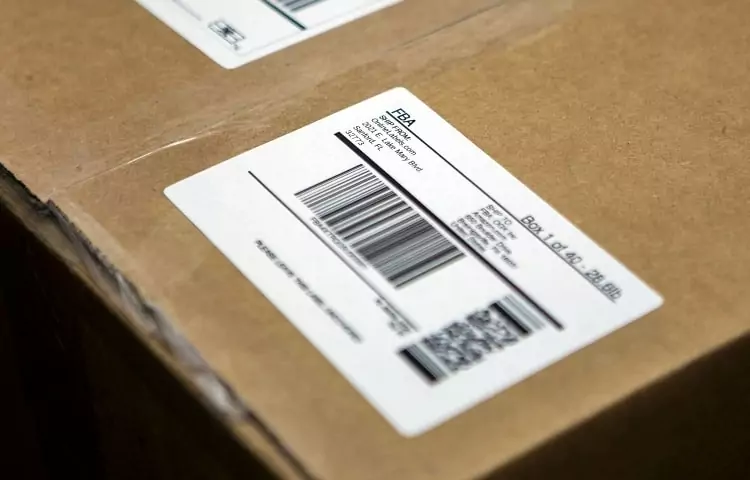
4. Shipment ID or Box Label (for cartons)
If you’re labeling boxes for shipment, each outer carton sent to an FBA fulfillment center must include:
-
Amazon shipment ID label (generated in your shipping plan)
-
Carrier label (UPS, FedEx, etc.)
These identify the shipment and link it to your Seller Central shipment plan.
5. Country of Origin (when required)
Some products, especially those subject to import/export regulations, must include the country of origin on the packaging (e.g., “Made in China”).
Additional Tips
-
Never cover existing barcodes on the product packaging unless instructed (Amazon prefers only one scannable barcode visible).
-
Place the FNSKU label on a flat surface where it won’t crease or fold.
-
Use high-quality printers and adhesive labels that won’t fade or peel during shipping.
-
If your products are multipacks or sets, mark them clearly with labels like “Sold as Set” or “Do Not Separate.”
How To Print Labels to Sell on Amazon
As an Amazon seller, you have four label-printing options at your disposal.
1. Print the Labels Yourself
You can print your labels using all the necessary tools available on your Amazon Seller Central page. We’ll explain how to print Amazon FBA labels at home in the next section, but know that this method requires you to have a printer and printer rolls for creating, printing, and sticking.
2. Amazon Label Service
Amazon label service gives you a straightforward option to let Amazon add your stickers at the fulfillment center. However, you are supposed to change your ‘Who prints’ setting to ‘Amazon’ to activate the service. Amazon US charges a flat label fee of $0.30 per item for standard FBA and $0.10 per item for FBA Small and Light. In comparison, Amazon Europe charges £0.15, £0.25, and £0.35 per item, depending on the size.
3. Use The Existing Barcode
If your products qualify for manufacturer barcodes, you can use the existing barcodes avoiding the hassle of printing.
4. Use Custom Printed Barcodes
Ordering custom-printed barcodes can be an easy way to streamline your labeling process without spending much time. You can let third-party companies create custom-printed barcodes with shape, size, and design elements.
How to Print Labels at Home?

Printing your Amazon FBA labels at home may seem like a tedious process at first, but once you get all the supplies and get it up and running, you’ll likely find you prefer this option of label printing.
Follow our step-by-step guide for a detailed explanation on how to print your own FBA labels:
Step 1: Open your Amazon Seller Central and log in to your seller’s account.
Step 2: Go to ‘Inventory’ and select ‘Manage FBA Inventory’ from the menu bar.
Step 3: Look at your inventory list and choose the products you wish to print.
Step 4: Click ‘Edit’ on the right of your selected product. In the dropdown menu, click ‘Print item labels.’
Step 5: Select the quantity, size, and other label preferences according to your needs. We recommend 40 for a standard size.
Step 6: Once you are finished with the customization process, click the yellow button saying ‘Print labels for this page.’ Amazon will send you a PDF file with a digital copy of all the labels for your entire shipment.
Step 7: Upon opening, click ‘Edit’ at the top and select the ‘Take a Snapshot’ suggestion. Next, adjust the total area of the snapshot by increasing the size so that it covers the entire label.
Step 8: Launch the print menu by clicking Control + P. Select your size orientation and click ‘Print.’ Your printer will instantly start printing the labels.
What is the Best Printer for Amazon FBA Labels?
Most Amazon tools are optimized for thermal printers. If you don’t want to invest in a thermal printer, a laser printer can work just as well, but we recommend purchasing a thermal printer. With thermal printing technology, you don’t have to worry about ink or toner. It’s perfect for printing shipping labels and other small labels.
One important note: avoid inkjet printers at all costs — these standard printers do not work well for labeling. Below, we’ll list some of the best printers for Amazon Sellers:
DYMO Labelwriter 550
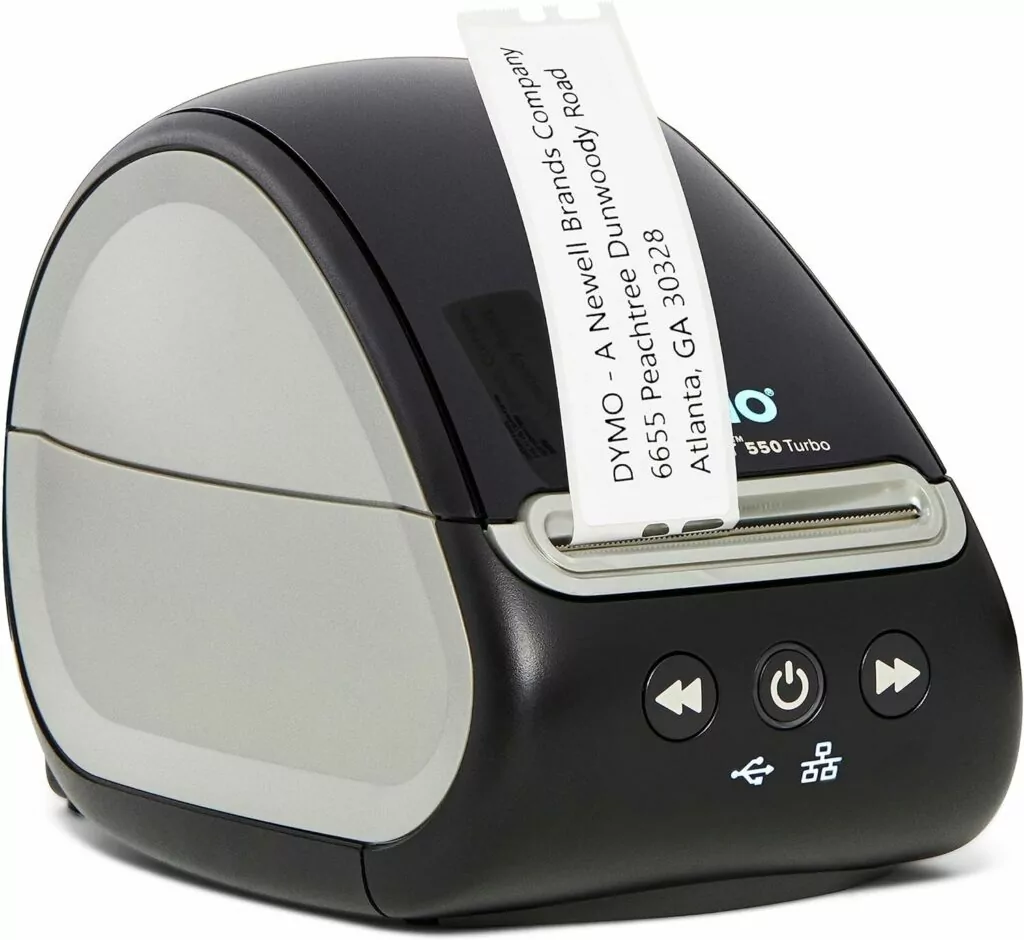
The DYMO 550 is one of the most popular printers available for Amazon sellers, replacing the DYMO 450. The new version features label recognition and faster printing, up to 62 labels per minute, according to the brand.
You can easily use this device to print FNSKU labels or other labels like expiration dates or informative labels (this side up, choking hazard, etc.). The DYMO 450 is one of the best printers for Amazon FBA products in terms of affordability, reliability and quality. This thermal printer costs anywhere from $95 to $190 depending on where you buy—be sure to shop around for a good deal.
To print FNSKU labels on the DYMO Labelwriter 550, we recommend using 30334 or 30252-sized tags. Unfortunately, unlike the 450, the 550 only allows you to use the DYMO brand label paper, so you can’t choose generic brands to save extra money.
ROLLO Label Printer

ROLLO printer is exceptionally dynamic and faster than many other thermal printers on the market. This printer can quickly churn out 4×6 shipping labels without struggling, and is compatible with various label sizes. If you are a seller who also sells via Merchant Fulfilling or on Shopify or Etsy, this printer be a game-changer for your business.
The ROLLO may be a little pricier than some of its competitors, ranging between $180 and $200. But if you can splurge a little, we highly recommend ROLLO for its additional features. Plus, unlike the DYMO 550, ROLLO is compatible with third-party labels, so you can save money buying generic there.
We highly recommend the ROLLO printer if you want a handy and fast device that prints both shipping and FNSKU labels. If you are a big seller who ships a considerable amount of inventory, this printer should be your next purchase.
Munbyn Printer
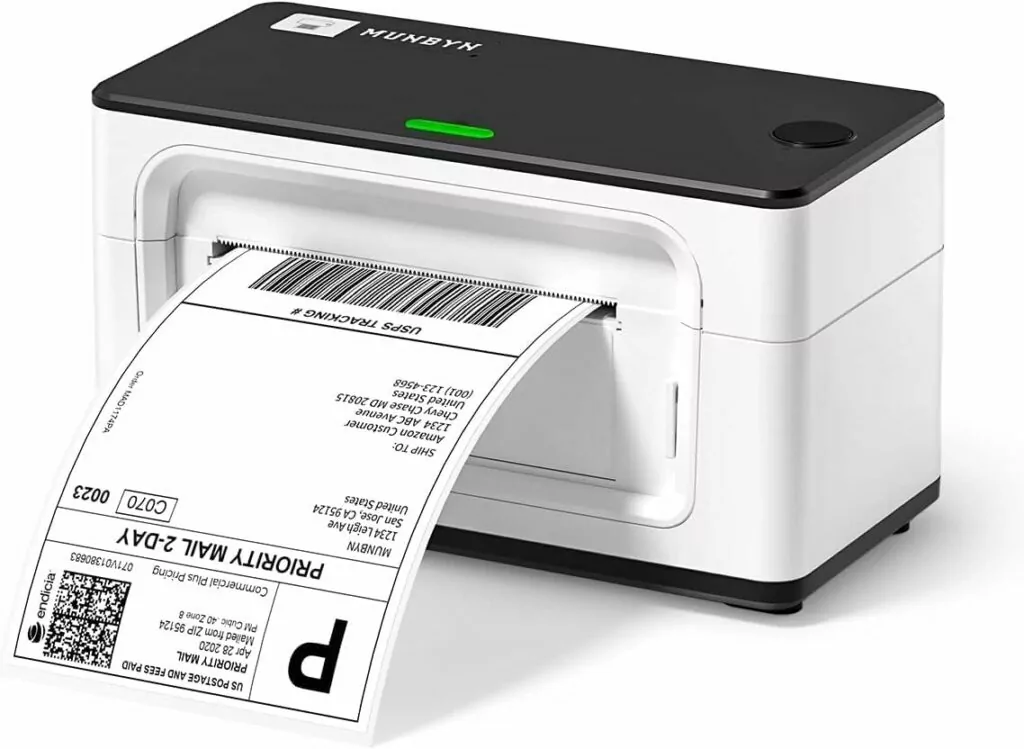
Munbyn offers a range of thermal label printers suitable for Amazon FBA sellers. Their printers are known for their durability and high-resolution prints. The Munbyn printers support both Windows and Mac operating systems and can print a variety of label sizes. With a print speed of 150 mm/s, these printers are efficient and can handle large batches of labels.
One of the standout features of Munbyn printers is their compatibility with various label software such as ShipStation, EasyPost, and Ordoro. This makes it easy for sellers to integrate the printer into their existing workflow without any hassle.
Munbyn also offers excellent customer support and provides a lifetime technical support guarantee. They also offer a money-back guarantee within 30 days if you are not satisfied with the printer’s performance.
In terms of cost, Munbyn printers are budget-friendly, hovering around $170 to $199, which make them an attractive option for small to medium-sized businesses. They also have a compact design, making them perfect for limited desk space.